Sunday, January 30, 2022

CHART / Analysis - Maximum Speed of Doom Tower Enemies

In this RAID Shadow Legends blog post I want to share with you my chart / analysis of the maximum speed of enemies in the Doom Tower. This includes Waves as well as Bosses and is broken down into the current 3 Doom Tower Rotations.

CHART: Maximum Enemy Speeds in the Doom Tower

Here you can see the 3 Doom Tower Rotations (selected stages) separated by Maximum Speed in Waves and Boss Stages. Observations:

  • Normal difficulty on Waves is limited to around 100 Speed - should not be a problem.
  • The Normal boss stages fastest speed is dominated by the Grythion and Dark Fae going up to 190 Speed.
  • The top parts of the Hard Doom Tower Waves become significantly faster. Starting Hard difficulty speeds of around 150-160 go up massively to around 260 at Wave 119.
  • Bosses are a similar story but here also Bommal speeds up significantly reaching top speeds of the highest Bosses despite him being at a lower stage. To be fair Stage 90 should not be as fast as Stage 120 especially for an unbalanced boss like Bommal.
I wrote down a suggestion on the chart: "Target ideally from minimum 191 to around 200+ for your champions with your Turn Meter control champion with minimum 265 Speed"

SPECIAL THANKS

As I posted previously, but happy to repeat again, thanks to Bobo for gathering RAID Shadow Legends statistics and publishing them for people to use. 

Please like/share/up-vote if you liked my blog post so that it reaches and helps other RAID Shadow Legends players.

Saturday, January 29, 2022

Doom Tower Hard Floors 112-120 with Mediocre stats

In this blog post I share my champions with screenshots and stats which I used to beat Doom Tower Hard Floors 112-120 with Mediocre stats.

If you want to win Doom Tower Hard you can plan and prepare these champions ahead of time. This also includes making a decision to dedicate Scyl of the Drakes to Doom Tower. As most of us have only 1 of her; she is a great champion. I had to re-spec her from her previous Warmaster build to dedicate her to maximum Stun.

Notice especially the Floor 117 / 118 Team - this team can fully auto almost the entire Doom Tower!

Table of Content

  1. Doom Tower Hard Floor 112 - the hardest floor
  2. Doom Tower Hard Floor 114 victory / results screen
  3. Doom Tower Hard Floor 115 victory / results screen and stats
  4. Doom Tower Hard Floor 116 victory / results screen
  5. Doom Tower Hard Floor 117 - FULL AUTO Team + cool screenshots 
  6. Doom Tower Hard Floor 118 - FULL AUTO
  7. Doom Tower Hard Floor 119 - SEMI AUTO + stats + screenshot
  8. Doom Tower Hard Floor 120 Armiger on Soraph 294k-338k damage
  9. then stats and victory / results screen
  10. Masteries: Group 1, Group 2, Group 3
  11. Last points.
  12. Good luck paragraph. 

Doom Tower Hard Floor 112

I completed Doom Tower Hard Floor 112 which is considered as the hardest floor in the Doom Tower with this team:

(I didn't catch the victory screen because RSL Helper moved to the next state when I looked away for a moment).

As this is the hardest floor you end up replaying it a lot if unlucky. The main thing is for Scyl to get frozen as little as possible and for the stuns to work. As it is RNG, if you fail just keep replaying until it works. The 5th slot is your damage dealer. I used Urogrim which was not super as he only puts 2 poisons (but his heals helped me survive) and I didn't have another good champion like some of those which put 4 poisons. 

I am working on Akoth the Seared - I think he is a great option, but mine is still at level 50 (5 star) and he lacks stats, especially Accuracy (I need the banner from 6 star) to land his skills.

  • Lady Kimi - speed lead, booster, TM control
  • Psylar - stun / TM control
  • Bellower - stun / TM control + ATK/DEF down + Block skills!
  • Scyl - stun / TM control + Revive/Heal.
  • Damage dealer.

List of Enemies HARD Floor 112

As mentioned this is the most difficult floor. The enemies have extreme stats + freeze + stealing your buffs + hitting extremely hard.

  • Wave 1, with Gurgoh and Sir Nicholas, is still OK relatively speaking.
  • Then comes the Wave 2: 3 Tormins and 2 Gugohs
  • And Wave 3: 1 Tormin, 2 Sir Nicholas and 2 Gurgohs
(Picture thanks to HellHades website)

Doom Tower Hard Floor 114 

I don't have good Savage items, so I tried to use more buffs for the Seer damage. In this fight:

  • On turn 1 Lady Kimi will reduce speed. Bellower will do the ATK/DEF down (small versions), Skyl will stun, Demytha will skip (just A1 attack) and Seer will put Weaken.
  • Then on Turn 2 Kimi will give 2 buffs (Speed and Accuracy), Demytha will give 2 more (Block Damage and Heal) and Seer will do her damage skill (Karma Burn). 

As my gear is mediocre this will only take half or a bit more than half of the enemy health. Then it's regular stun-playing to finish the wave. Seer dies multiple times and gets revived by Scyl. The purpose is to arrive to the next wave with all skills available to repeat the above.

List of Enemies HARD Floor 114

This floor does not allow you to freeze the enemies with Ninja because of the Dark Elhain who will use her passive skill to decimate your team if you dare freeze anyone, so stun and provoke are the primary Turn Meter control mechanisms.

As before, the enemies have extreme stats and Rotos many of them can 1 shot kill my champions due to my weak stats. As with any difficult Doom Tower floor it took me a number of attempts to get the stuns placed and everyone doing their job well.

Here the challenge was not as much the stuns as my team does that very well, but keeping the damage dealer alive - the enemies just keep killing it and when Scyl revives she places Ally Protect which gets her killed when they kill the damage dealer again and again.

Update: 

Dealing with the Rotos/Siphi combination:

(for weak/mediocre stats like mine) What worked the best is simply killing the Rotos(es) first while controlling Siphi with Stun. During one of my fights, at one point Siphi even came out (stun failed) and revived one of the Rotos but I just killed him again. Rotos is much weaker than Siphi and dies much easier.
 
For people who have stronger gear/stats than mine who can 1 shot Siphi - that would be the best. I tried to switch my weak Seer to Shamael for single target killing and that worked a lot better - I will do that next time. My Shamael could almost 1 shot Siphi leaving 20% health, so he is also not strong enough, so I switched to 1 shotting Rotos instead which worked perfectly (another good single target damage dealer is Faceless who fully ignores armor).

(Picture thanks to HellHades website)

Doom Tower Hard Floor 115

In this wave I used Geomancer - he has horrible stats: 157 speed, 33k HP. But his Burn reduces the Turn Meter fully and when someone attacks (which usually hurts me really strongly and even kills the champion from 1 hit) then this damage is re-directed on the enemy and this is how I killed them. 

Naturally Scyl keeps on reviving Geomancers who dies constantly. Once I manage to free Geomancer from my 1 key UNM Clan Boss team I can give him better stats. At present he is stuck because he is part of a Speed Tuned team for Clan Boss.

Stats

And here are the stats:

List of Enemies HARD Floor 115

This floor also does not allow you to freeze the enemies with Ninja because of the Dark Elhain.

Here I used Geomancer to target:

  • In Wave 1 priority was Gurgoh then Mountain Kings. Tormin was left for the end.
  • In Wave 2 same.
  • In Wave 2 started with Turvold as he can hit really hard, then Gurgoh and Mountain King.
  • Dark Elhain also hits hard - they all do, it's just a matter of priority and danger. She is just less dangerous than the others.

(Picture thanks to HellHades website)

Doom Tower Hard Floor 116

List of Enemies HARD Floor 116

In this floor the first 2 waves can be passed by my FULL AUTO team but the main problem of this floor is Wave 3 with 2 Siphis (+ Rotos + Mountain King).

Technically Ninja freeze can be used here and I am sure with sufficient attempts the RNG will be successful in one of them, but I went the Seer direction so if I fail to stun them I can use the Seer to strip their buffs (and damage them). 

I am 100% sure a full stun team can handle this floor if you put it on an autoclicker and let it do many attempts. And as mentioned I am working on Akoth the Seared who I also think can handle this by putting their skills on cooldown.

(Picture thanks to HellHades website)


Doom Tower Hard Floor 117 - FULL AUTO

Nothing special to say here because the team completed this doom tower floor 100% on auto. I didn't have to interfere at all.

Cool screenshots from the wave - 1

Cool screenshots from the wave - 1

Doom Tower Hard Floor 118 - FULL AUTO

Same as the previous wave/floor, nothing special to add - the team completed this floor 100% on auto. I didn't manual anything.

Doom Tower Hard Floor 119 - SEMI AUTO

Team stats:

Screenshot from wave 119

Armiger vs Soraph

Doom Tower Hard Floor 120 Armiger on Soraph 338k damage:

Doom Tower Hard Floor 120 Armiger on Soraph 294k damage:

Doom Tower Hard Floor 120 Soraph with Armiger 1

This is the team I almost won with but the game crashed, gave me a server error after 45 minutes.

I then switched in Raglin, who had Warmaster, for Doompriest to hopefully make the run faster since none of these champions had Warmaster.

So basically this was 3 Revivers + Booster + Armiger. The point is to survive and let Armiger do the work.

Soraph stats:

For reference the boss's stats are:

Masteries

These are the masteries I have on my champions:

First group: Visix the Unbowed, Arbiter, Ninja, Lady Kimi.

And here is Scyl of the Drakes, Psylar, Bellower and Geomancer.

And here is Armiger, Demytha, Urogrim, Seer. Naturally there is a lot of work to be done for Armiger, but I have other priorities at the moment and this got the job done.

Last points:

  • This was all from the Soraph Doom Tower rotation. Although the same principles apply on other rotations, so when talking about waves especially the same champions will do the work. Bosses are different and for those different strategies will be needed.
  • Naturally there is a lot I can improve and this will help to reduce the time taken to complete the waves as well as reduce the attempts in case of fails.
  • A note on Soraph, the Block Revive strategy works - Armiger is not special, any champion who has Block Revive can do the job. Otherwise, a very easy strategy is simply to use Drexthar which is a champion that everyone has and give him 530 Accuracy (becomes 600 with his Leader Aura) and he will win simply via HP Burn. Books are not necessary but help speed up the run

Completing Doom Tower Hard in RAID is a major milestone as that is the hardest content RAID has to offer. I congratulate anyone who has beaten it and hopefully my blog post will help others to achieve success.

Thursday, January 27, 2022

Kamui Valkyrie Cosplay Costume

Kamui from Kamuicosplay was sponsored by RAID to create a cosplay costume for the Valkyrie champion and she did a fantastic job! Please find below:

  1. Some Pictures
  2. Video of her showing the costume
  3. Link to her website

Kamui's brand new Valkyrie costume

Here is a picture showing both front and back - both sides are very beautiful! Amazing work!

Kamui Valkyrie Cosplay Video

Video explaining how Valkyrie costume was made

Link to Kamui's website

This link (https://linktr.ee/kamuicosplay) is actually to a page of links to ALL her websites and social medias where you can see her work on RAID as well as other companies.


Wednesday, January 26, 2022

Doom Tower Hard Floor 100 (Scarab King) with Mediocre / FTP team

In this blog post I share with you the team I have used to beat Doom Tower Hard Floor 100 Scarab King with very mediocre stats - 100% free to play team.

I have compiled the below picture to show all the information and below the picture you can read more details:


Champions

  • MVP my good old Armiger doing only A1 (forced via skill orders). As you can see he does not even have masteries. He is in Destroy set and the whole team waits for him to soften up the Scarab King to win. He can be significantly improved but I don't see the point of spending resources on him at this point (I have many other priorities).
  • Then Skyl is responsible for passive healing and after a bunch of hits she will put on SLOW debuff. Weak affinity makes that harder but sooner or later she gets it done. In the meantime the team can take a couple of hits if needed and she can revive. If bad luck happens then simply replay.
  • Visix is doing a similar job as Armiger. Also just A1.
  • Geomancer helps with TM reduction + damage.
  • Shamael is there just for damage. I used Ninja on lower levels which was more effective, but, due to affinity, my Ninja cannot survive on Floor 100 so I switched to Shamael.

Masteries

  • Armiger: none as on picture.
  • Skyl: nothing for this boss, she is in a stun set with stun mastery for waves.
  • Visix + Geomancer + Shamael: offense to do more damage and defense to survive a bit more.

Shielding

Each champion must have 1 piece of Bloodshield accessory - since our clan does not bother much with CvC I mostly only have rings, so I gave 1 ring to each champion.

Champion Replacements

  • Shamael can be replaced by any champion.
  • Geomancer helps in several ways but basically can also be replaced by any champion whose skill kit includes strong Turn Meter reduction. A completely free option = Lich or another Armiger.
  • Scyl should not be replaced - everyone has this champion.
  • Visix can be replaced by any strong Turn Meter reduction champion.
  • Armiger... no comment :)

Other Tips

  • If you can make yourself faster via Speed boosts or TM boosts it will significantly reduce stat requirements, which are already pretty mediocre in my team.
  • If you have better champions such as Alure, naturally use her.
  • If you don't have enough Accuracy which is required for TM reduction to work then you need to use an Accuracy Leader champion like I am.
  • Of course, if you have better equipment than me - use it. My Geomancer as you can see has only 157 speed and very low survivability (I use him in a Clan Boss speed tune) - most people can put better stats than this.

Sunday, January 16, 2022

Really COOL picture at the end of Minotaur run due to server lag

Really cool picture at the end of Minotaur run due to server lag. It's like champions know picture is being taken and are posing for it :) 

The boss (Minotaur) is actually in his "dead" animation - that's the face he makes when he is killed.

Champions from left to right:

  • Ninja
  • Lady Kimi (training masteries)
  • Deacon Armstrong (team leader)
  • Akoth (training masteries)
  • Inquisitor Shamael - hard to see due to the massive arm of Akoth covering him.


Saturday, January 15, 2022

Spot 10 Differences - Deacon Armstrong - RAID Shadow Legends

I created this Spot 10 Differences puzzle in the honor of RAID's Deacon Armstrong who supports our teams with speed aura, useful debuffs and turn meter increase.

I made it difficult to make it challenging for you. It is always hard to get the balance right because there are so many different RAID players. Some solve the puzzles very quickly while others struggle so it is hard to please everyone. I did my best - hopefully you will enjoy.

Feel free to post in the comments below if you managed to solve this Deacon Armstrong puzzle.

Finally, as you probably know, you can click on this, or any other, picture in my RAID Shadow Legends blog to see it bigger - this helps especially with puzzles like this.


Friday, January 14, 2022

Trunda's 15 milion attack damage madness

Vraccal posted mad Trunda info on Reddit showing Trunda hitting for near 15 million damage per attack per Hydra Head. Picture:

A lot of people are surprised/shocked by this, but it is not "normal" or at least people hope it is not. Vraccal shared his Trunda build (pictures below) but he said that it has nothing to do with the build and has to do with Truda's A2 being broken.

Trunda's build picture 1 of 2

This Trunda is impressive in any case and we can see that on the build:

Trunda's build picture 2 of 2

  • Very high 7.25k Attack
  • Going with a huge 284% Crit Damage
  • That's going to hurt...
  • It is impressive that with such strong offensive power the champion also has 51k HP and 2.2k DEF so it's not easy to kill either.

Is Plarium going to fix it?

Well that certainly is the question. I also don't know if this has been going on since Hydra was launched and only now coming to awareness.

They might also take their time before fixing it because there is only a small percentage of players who has Trunda.

Wednesday, January 12, 2022

Boomer does Hydra Nightmare 1 key (39m DMG, 13 min) on Full Auto

In this short blog post I am sharing the video that Boomer posted where he does Hydra Clan Boss on Nightmare difficulty 100% on Auto with 1 key.

That's pretty impressive and, of course, most people will not have his champions and his gear but it is already interesting to see that it has been accomplished.

From here on, RAID players will try to improve and expand so more people can achieve that.

Champions he used:

The stats are insane - 99.9% of players don't have this. But it is on Nightmare difficulty so players on Normal/Hard can, of course, have much lower stats.

  • Dutchess with 90k HP, 3.8k DEF, 293 SPD, 497 RES, 238 ACC
  • Krisk with 64.5k HP, 3.6k DEF, 277 SPD, 502 RES, 423 ACC
  • Tuhanarak with 53k HP, 4k DEF, 268 SPD, 476 RES, 415 ACC
  • Venus with 50k HP, 2.9k DEF, 247 SPD, 458 RES, 410 ACC
  • And 2 damage dealers:
  • Ninja with 40.7k HP, 1.8k DEF, 267 SPD, 173 RES, 448 ACC, 229 CDMG
  • Royal Guard with 49k HP, 1.8k DEF, 246 SPD, 140 RES, 177 ACC, 245 CDMG

Boomer's Video:

Title: "FULL AUTO 11 MIN 1 KEY NIGHTMARE HYDRA SHOWCASE"

Video:


Saturday, January 8, 2022

14.71m damage on Hydra Hard with WEAK STATS: SPD from 157, HP from 33k, 2x 5* champs, DEF from 1945

In this blog post I share my success of 14.71m damage on Hard Hydra Clan Boss with a team with very weak/mediocre stats. Update: I also added stats, masteries and lots of explanation.

  • Speeds from as low as 157 
  • HP from as low as 33k
  • 2 champions at level 50
  • DEF from as low as 1945
  • Few masteries on Kimi 
  • Some on Umbral
  • Arbiter in Arena set (Defense/Support), i.e. no Warmaster.
  • Umbral's Block Buffs totally unbooked, so she failed a lot (I will consider to book her during next CvC, she just takes too many books so I have to think) - I might have performed better if she didn't fail. Picture at the bottom.

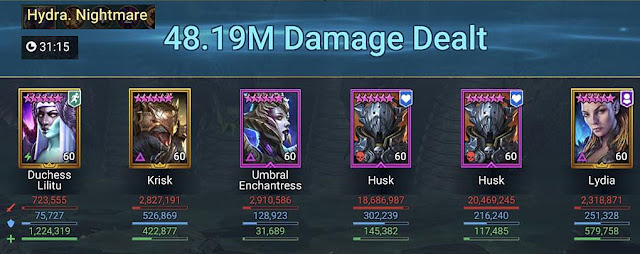
Picture 1 of 3 - the battle result:

This team composition strategy focuses the entire team to do nothing else than support Geomancer. As you can see from the picture Geomancer and Shamael did all of the damage.

Picture 2 of 3 - the stats:

  • Geomancer is my Clan Boss champion (tuned team) - not changed for Hydra
  • Aox was my old Clan Boss champion (untuned team) - not changed for Hydra
  • Arbiter is my Arena lead - not changed for Hydra
  • Umbral has been a secondary champ, used in niche cases where I needed Provoke. Not planning to 6 star her yet - lower priority. But I will maybe book her during the next CvC because she keeps failing Block Buffs when unbooked.
  • Kimi I did not invest in because there is no Shadowkin Faction War yet (so I invest in other factions), but I will definitely 6 star her among the next ones.
  • Shamael is my Doom Tower sniper - not changed for Hydra.

Update: Picture 3 of 3 - Masteries:

Here also picture of the masteries for reference - there is room for improvement.

Reference: Umbral skills:

Update: some battle concepts:

The first priority was to take out the Head of Blight as I didn't have anything to deal with all its poisons. I only had mediocre healing from Aox and the near-dead healing from Arbiter.

All supporting champions tried to attack Head of Torment to give boosts to Geomancer or Arbiter when Geo was dead. For this it is important you put Arbiter in the 2nd position so she becomes the leader during all those times when Geo is killed.

If it is possible to let your champion with Mark of the Hydra die - do that. That's much easier than trying to recover them. That means having some difficult moments of not healing and letting Hydra kill it off. It is not always possible, but sometimes it certainly is.

Try not to kill Head of Torment. Any stronger attacks should be directed elsewhere such as the A2 of Shamael. He will still die, I had 2-3 Torments during my battle including 2 rotations without Torment.

When Head of Decay comes focus all efforts to kill it. That's the most dangerous Head of Hydra. However, make sure at all times that another Head has lower HP otherwise Decay will shield himself and we don't want that.

When Head of Suffering appeared I was happy. Even though he reduces damage and can be annoying he is not dangerous and he is slow. Completely ignore Head of Suffering as a low threat.

Head of Wrath must be watched carefully. He has the potential to wipe the entire team. For this reason you should have 1-2 very tanky champions allowing you to replay the battle if needed. In my case Aox and to a lesser degree the Arbiter were my tough cookies. Multiple times it happened that everyone died except those 2 and Arbiter brought everyone back followed by Aox's healing above the 50% after Arbiter's healing.

Head of Mischief is almost in the same category as Head of Suffering but he is more dangerous because he is much faster and if he eats one of your champions it's hard to target him. So after putting HP Burn on Head of Blight then I targeted Head of Mischief.

I did not use Arbiter's boost/heal as soon as she has it. I had to make a decision if my team will die then I should keep it to use it after Revive. Otherwise I only used it when the team was in acceptable health and Head of Wrath was not near 15 counter.

Most of the time I did not use Speedup of Kimi and used only the slow. This is because often Block Buffs failed on Mischief (as I mentioned my Umbral is not booked in that). I only actively started using Speedup after Head of Mischief was dead and I was fighting different configurations of other Heads.

I also did not use Aox's heal immediately. I wanted to make sure it comes after Arbiter's heal and also after debuffs are placed for maximum effectiveness (his heal depends on the number of debuffs).

Umbral did absolutely nothing other than trying to put Block Buffs and doing A1 on Head of Torment or whatever Head when Torment was missing. My Umbral does no damage at all so I don't care what she attacks.

- - -

This turned out to be a pretty long blog post (please like/share if you liked it), so I hope it helps other RAID Shadow Legends players who are struggling with the Hydra.

Lord Champfort SOLO series; Arcane Keep + Stats / Masteries

In this blog post we focus on Lord Champfort as an instrument / champion to solo dungeons in RAID allowing for training champions while doing dungeons. This significantly boosts the progress of RAID players' accounts bringing 6 star champions faster.

Lord Champfort is definitely not the only champion capable of this and I will make more blog posts on this topic, but this specific post focuses on Lord Champfort in the Arcane Keep.

Other locations I think he can do:

  • All Potions Keeps except Magic because he cannot overcome the shield.
  • Ice Golem
  • Lower stages of Dragon. Stage 20 he cannot handle with my equipment. Stage 16 he can but loses sometimes. The issue with Dragon is that Dragon "cheats" - his normal attacks do not hurt Lord Champfort but his "cheat"-attack just one shots him after some time.
  • He can do lower stages of Spider, but that's probably not a good idea unless one is doing it only for Dungeon Diver points.
  • Fire Knight he cannot.
  • And of course he can do any campaign farming but he is not the fastest in that job.

Picture 1 of 6:

Setting Lord Champfort with 4 food champions where he also gets a big boost to HP with his Leader Aura.

Picture 2+3 of 6:

On the negative side the run takes some time, but we can set it to run on auto while we do other things. On the positive side we win potions as well as train 4 food champions at the same time.

Also the time can be reduced to 3-4 minutes with better equipment than mine (I am Mid-game, still much to improve).


Picture 4+5 of 6:

Lord Champfort puts multiple debuffs on all enemies and, being tanky, he takes practically no damage:

  • Attack down
  • Accuracy down
  • via his passive skill - Slow on anyone who attacks him
  • with his A1 he will put Defense down on those he attacks

And on the boss:

Picture 6 of 6:

I built my Lord Champfort very tanky getting to close to 80k HP which further increases by 50% due to his Leader Aura I mentioned bringing it to around 120k HP.

On this HP he puts up his shield and most enemies don't even manage to reach his health. 

Using immortal gear he will regenerate whatever health he does lose.

Masteries:

  • Warmaster is the most important because Lord Champfort does not do much damage himself.
  • I chose the Offense and Defense trees. Some may argue for the Support tree but I didn't like it. Reducing Crit damage received by 8% is very significant I believe; on top of another 6% damage reduction all coming from the Defense tree.
  • I still have not completed the last 2 masteries, those are not critical - he can already do the job, but I will complete them for more efficiency.


Multiple Successful Hydra Team Compositions GravPi & Fujitora-Sama & Nub Raids

In this blog post I share with you various team compositions different RAID players used to beat Hydra Clan Boss with success in Rotation 2.

Team by Fujitora-Sama: Difficulty: Hydra Hard

Additional information provided:

This team works on auto as far the Head of Decay stays behind the scene. Head of Decay is the most annoying head.

This team speed goes from 268 to 206. Lydia and Pyslar are the fastest because they have to speed up your team and speed down the heads. By doing this, your team will have enough speed to over lap the heads to keep the debuffs uptime for the hole fight.

Block buff and attack down are the most important buffs here.

Gurptuk has his a2 locked so he can place continuous heals very often. ( He did 2 mil. heal )

Shamael is a must in this team. Gurputk can't be swapped if you don't want to use a reviver. You don't need the rest of the champions.Mashalled can be replaced by Yannica and Ursuga can be swapped by any attack down champion.

Kaiden has attack down and can revive up to two allies. Iron brago has def up, attack down and can boost your team def.

I have made another team without Shamael using Doompriest.

Team by GravPi: Difficulty: Hydra Nightmare

Husks are both in relentless with about 250 speed, 220% cdam, 50k HP. If you have refresh accessories (I only had one between them), those will be good as well.

The build is not that special, relentless with about 250 speed and 225% Crit Damage is what you want.

Teams by Nub Raids: Difficulty: Hydra Hard + Normal

Nub Raids made 2 videos showcasing 2 successful teams:

1) Geomancer DESTROYS Hydra rotation 2 -- Hydra HARD

2) Hydra rotation 2, easy EPICS ONLY 1 KEY team -- Hydra Normal


Friday, January 7, 2022

Star & Alphabet line for RAID players - Quality of Live improvement suggestion

There are so many basic things missing in RAID it's sometimes pretty shocking. Here I suggest one improvement which creates a lot of frustration for players.

  • Having to scroll to the right a million times when training champions
  • Looking for a specific champion among hundreds

Finding champions 

Often we search for a specific champion to check or to equip / set masteries. This can be annoying when players have hundreds of champions. A simple Star & Alphabet line as shown on the picture below would make that much easier.

Leveling up Food champions

Very frequently in RAID players have to train champions / level up food champions. Every single time RAID's badly made game design forces players to scroll multiple times to the right until they reach the food champions.

This is extremely annoying.

A Star & Alphabet line / filter, as shown in the picture below, would completely solve this problem showing only the champions you want with 1 tap or click:

I know that many RAID players say it is pointless to make suggestions since Plarium does not give a damn, but I try.